|
... and I wouldn't even call myself a linux super user. Even user would be pushing it if I didn't use a linux or *nix based system pretty much every day at work. If you are a linux user and comfortable with basic disk management, you can safely skip this post. So my Netgear ReadyNAS decided to unmount itself as a datastore in my ESXi host today. I did have a similar issue previously but had thought that was related to a firmware upgrade, now it appears it is just unstable. Not entirely sure what I'll be doing with it but it's clear it cannot continue as a datastore for my persistent VM drives. The up side of this is I get to rebuild Secuirty Onion (SO) on the Shuttle and blog about doing so. For those of you who don't know, Security Onion (SO) is a Network Security Monitoring (NSM) linux distro, which contains most of the tools you may need for traffic analysis. It's main strength is it's full packet capture capabilities, which allows you to view your network traffic historically. I'm installing SO onto an SSD in my ESXi host but I want to keep the logs on a separate physical drive. Firstly, because the log files can get large quickly, especially when doing full packet capture, and secondly it makes a good use of the HDD in the system. In ESXi this is replicated as I need to create a separate virtual disk as well. There's an installation guide on the SO wiki over at https://code.google.com/p/security-onion/wiki/Installation so I'm not going to repeat that too much here. I strongly recommend checking out the wiki before installing SO. WARNING! Please ensure you read up on the commands before trying them yourself. Some of these commands will break your system if implemented incorrectly. The commands used below worked for my system but they may not work for yours. The man pages, and other helpful sources of information, can easily be found online. So, I spun up my VM from the live ISO and installed to the local disk. Completed the SO setup, disabling Bro http.log but leaving both Argus and PRADS enabled as I want to play with both in the future. Once the installation has completed, run apt-get update and apt-get dist-upgrade to make sure everything is up to date. There is a guide for moving the /nsm directory at https://code.google.com/p/security-onion/wiki/NewDisk which is great for exisiting systems but, as this was a fresh installation, the first problem I ran into (as a non-linux user) was that /dev/sdb wasn't present on my system, and when I tried to mount /dev/sdb I got my first error message.  After finding some instructions, working them through and then coming across another error (when running sudo parted -l)  I did even more searching around and from a couple of threads realized that I was just doing things in the wrong order (formatting before partitioning). So, from the top, just after installation of Security Onion on a new system, I did the following: 1. Stop all Security Onion services with the command: sudo service nsm stop 2. Add the new disk by entering the following command and then press "n" for new partition and select partition number 1. All other settings are left as default. sudo fdisk /dev/sdb Then press "w" to write the changes 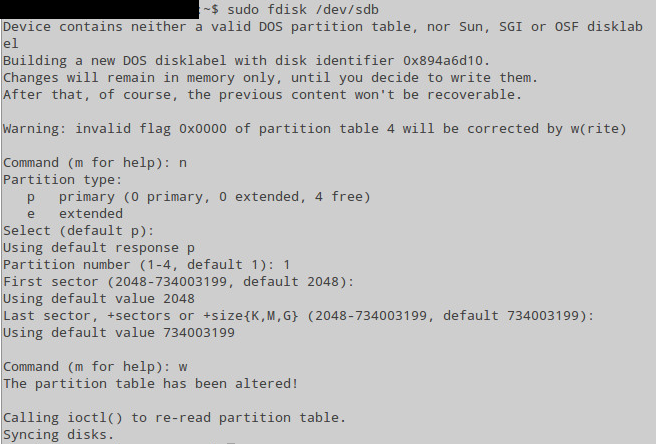 3. parted -l should now show a partition present on /dev/sdb. Format the partition with the following command: sudo mkfs -t ext4 /dev/sdb1 4. We are now ready to proceed with the migration of the /nsm directory. Mount /dev/sdb1 to a temporary mount point: sudo mount /dev/sdb1 /mnt 5. Copy your existing /nsm directory to the temporary mount point: sudo cp -av /nsm/* /mnt/ 6. Unmount the temporary mount point: sudo umount /mnt 7. Create backup of existing /nsm directory: sudo mv /nsm /nsm-backup 8. Confirm the UUID of the partition (required for the next step) with the blkid command: sudo blkid  9. Add a permanent mount entry to the fstab file. I use the vi editor but nano is also included in SO by default. sudo vi /etc/fstab And I add the following entry for the new mount point: UUID=06c8b481-8aca-4318-a8b8-abae4b47c394 /nsm ext4 errors=remount-ro 0 2 A quick break down of the fstab entry follows. UUID=06c8b481-8aca-4318-a8b8-abae4b47c394 - This is the UUID for the partition. /nsm - This is the mount point that the partition will be linked to. ext4 - The filesystem. errors=remount-ro - Options. Can be left blank but in this case I used errors=remount-ro which means, if the system detects any errors on the disk, it will remount it as read only. This may allow you to perform diagnostics and troubleshooting without further damaging any data. 0 - Backup information for the dump command. Always 0 (zero). 2 - Filesystem integrity check order. 10. Mount the directory. sudo mount /nsm 11. Start the SO services. sudo service nsm start You can then test the setup by running tcpdump on your monitoring interface, to confirm it is receiving traffic, and check Snorby to see if the IDS engine is working. You might have to generate some traffic to trigger some alerts. That's it for now, sludge3000
0 Comments
Leave a Reply. |
AuthorHaven't figured out how to de-capitalize the blog title yet :( Archives
January 2018
Categories |
 RSS Feed
